Overview
Bland supports inbound and outbound SIP. Point calls from your carrier or PBX at Bland to be answered by an agent, or have Bland place calls out through your SIP provider. Connections are organized as trunks. A trunk is a reusable connection to your SIP infrastructure — it holds the provider, direction, destination endpoint, and authentication. You attach phone numbers and DIDs to a trunk, and they inherit its connection settings. This guide covers:- Creating SIP trunks via the Setup Wizard or API
- Attaching numbers and DIDs for inbound and outbound routing
- Auto-discovery of endpoint settings, connection tests, and live SIP tracing
- Number porting to bring existing numbers to Bland
- Connection endpoints, firewall allow-listing, and security requirements
- The full SIP API reference
Quick Start
[1] Enable SIP Contact support to have theSIP entitlement enabled for your organization.
[2] Open the SIP Dashboard
Navigate to the SIP Trunks dashboard in the Bland app.
from value in a standard /v1/calls request:
SIP Setup Wizard
The SIP Setup Wizard provides a guided, step-by-step experience for standing up a trunk. Access it by clicking “Add trunk” on the SIP Dashboard. Every step can also be done programmatically — see the expandable API sections under each step, or jump to the full API Reference.Step 1: Setup
Name the trunk and choose its direction — inbound (calls coming to Bland), outbound (Bland placing calls through your provider), or both.API
API
Create a reusable trunk with
POST /v1/sip/trunks:Step 2: Provider
Enter your SIP provider’s endpoint address. The wizard includes a provider catalog with guided instructions for popular platforms:- Vonage — SIP endpoint
- Asterisk / FreePBX — Public IP or hostname
- 3CX — SIP trunk FQDN
- Cisco UCM / CUBE — Gateway address
- RingCentral — SIP endpoint
- Microsoft Teams — Requires a certified SBC (direct connection not supported)
- Other — Any standard SIP endpoint
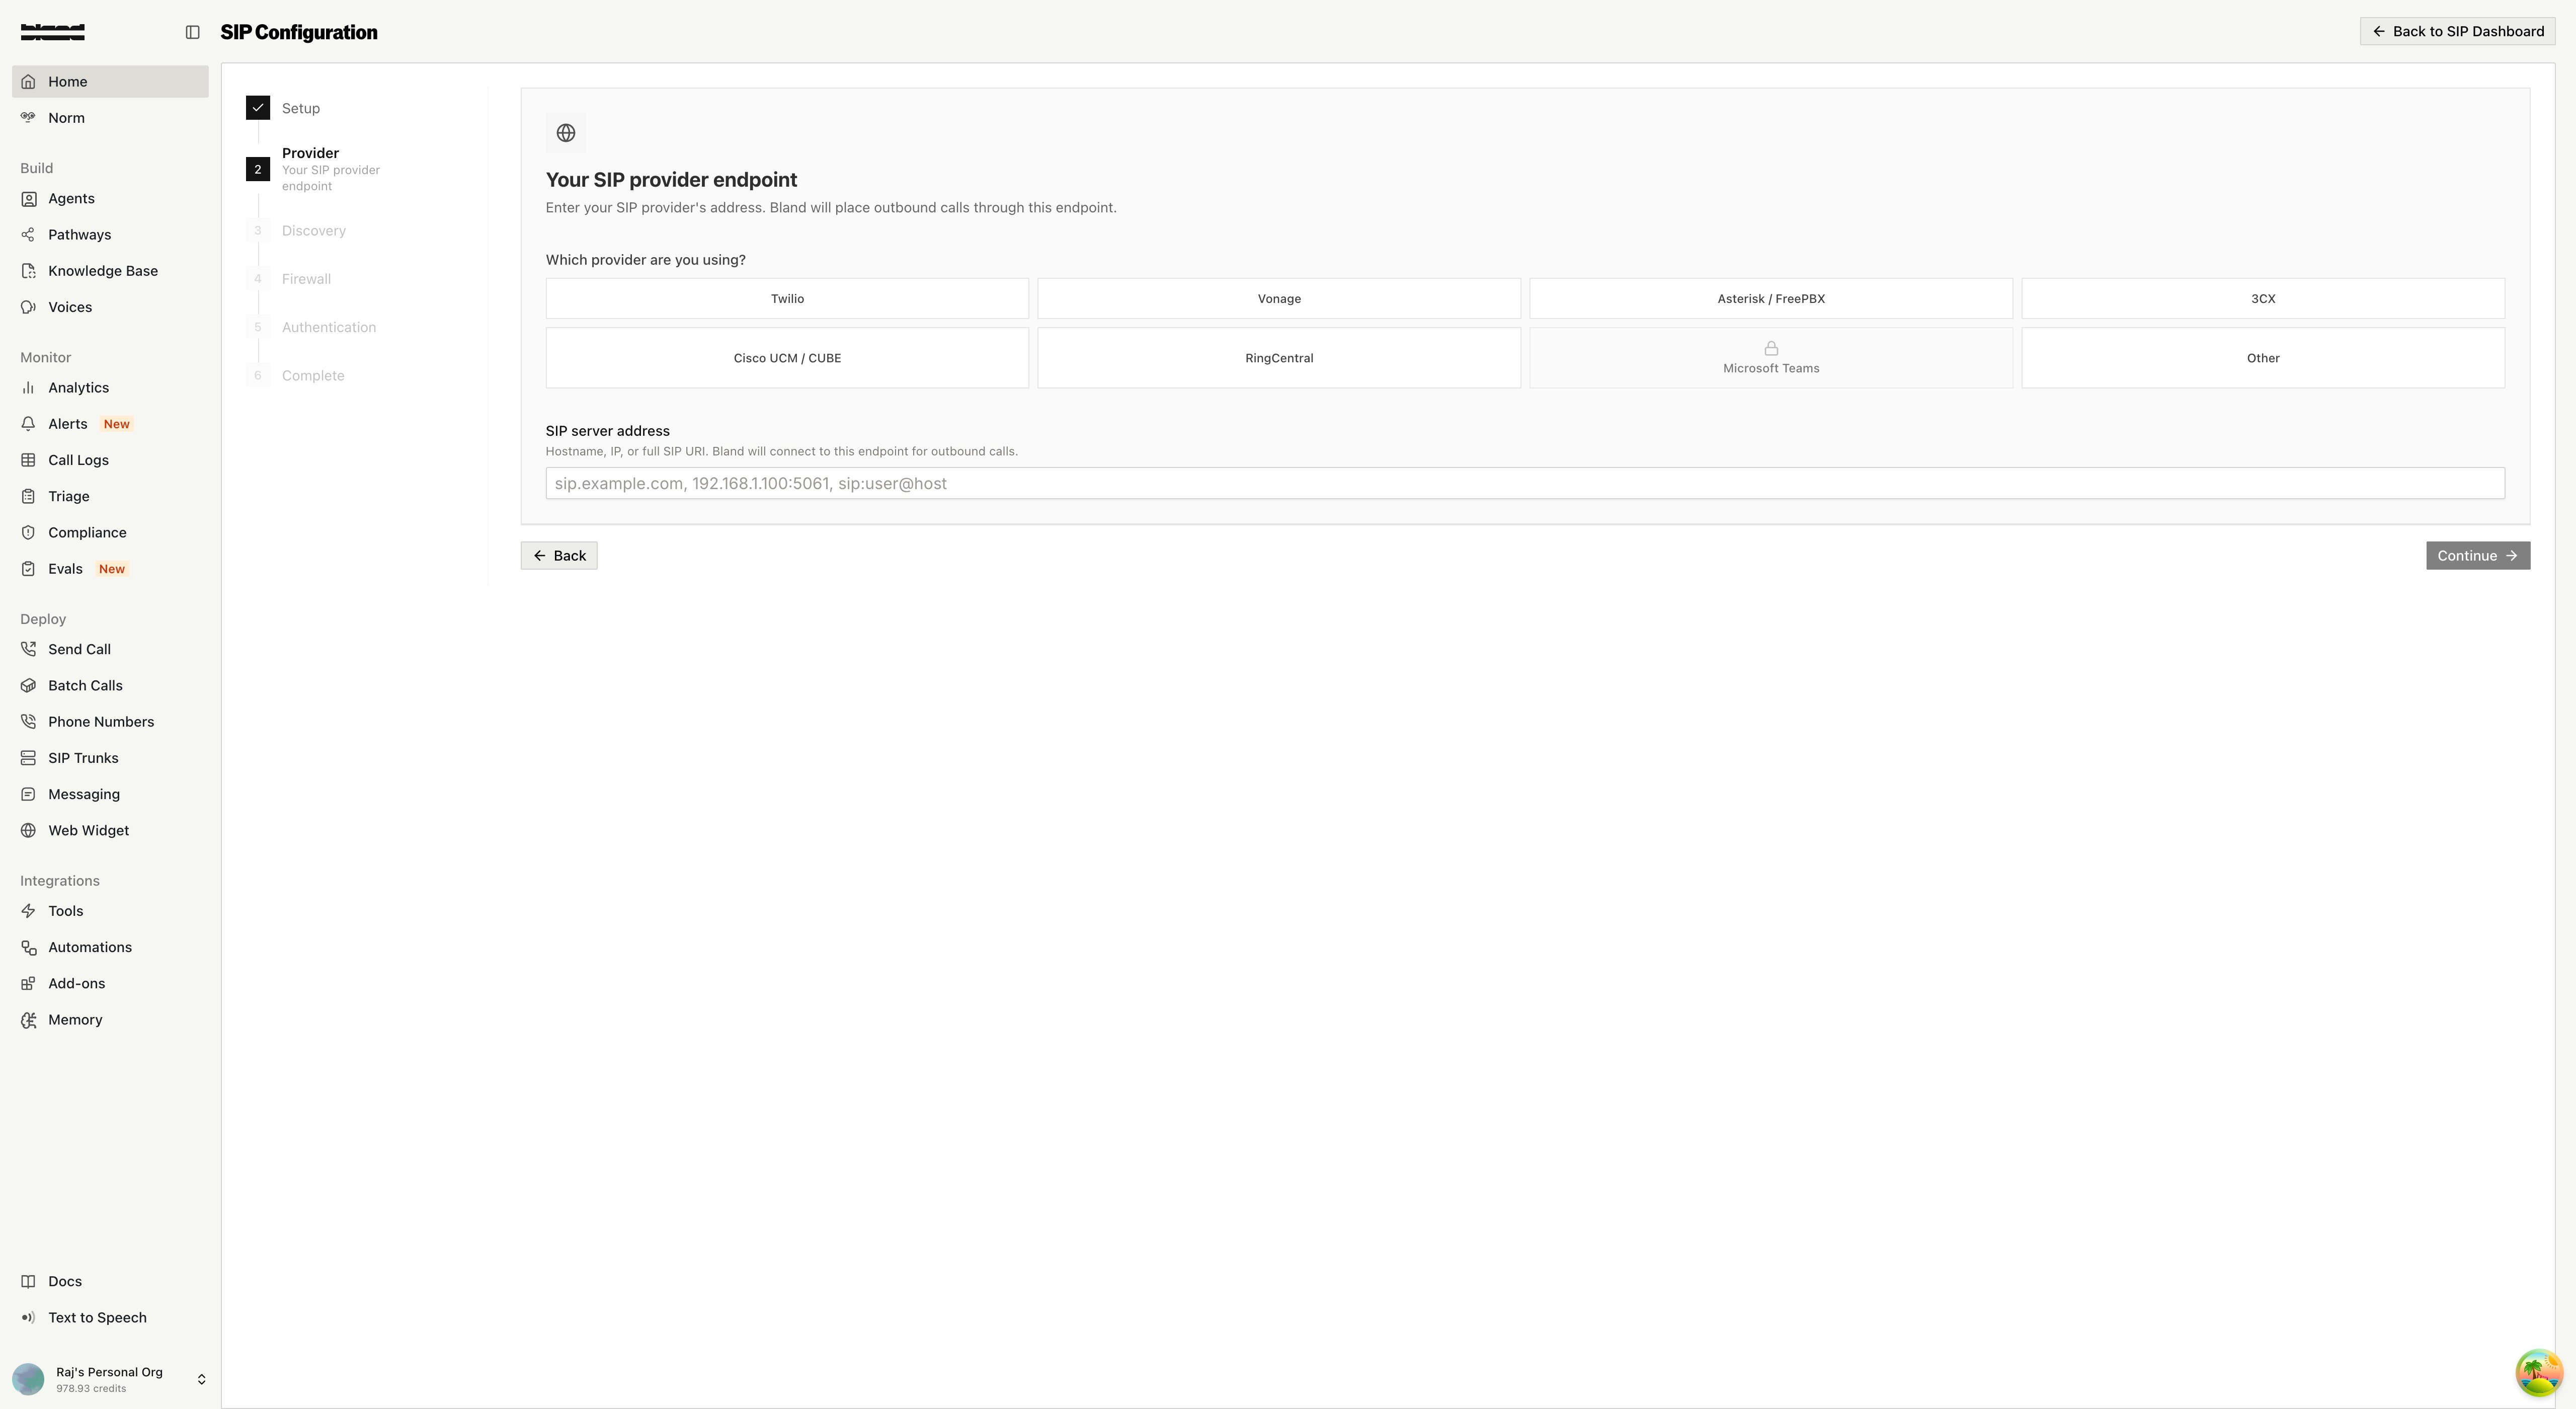
sip:user@host:5061;transport=tls, or shorthand like tls://host. It automatically parses the host, port, and transport for you.
API
API
Validate a destination before attaching with Then set
POST /v1/sip/parse-destination:sip_endpoint on the trunk, or in the directions of your POST /v1/sip/attach request.Step 3: Discovery
Bland automatically probes your SIP endpoint to detect the optimal connection settings.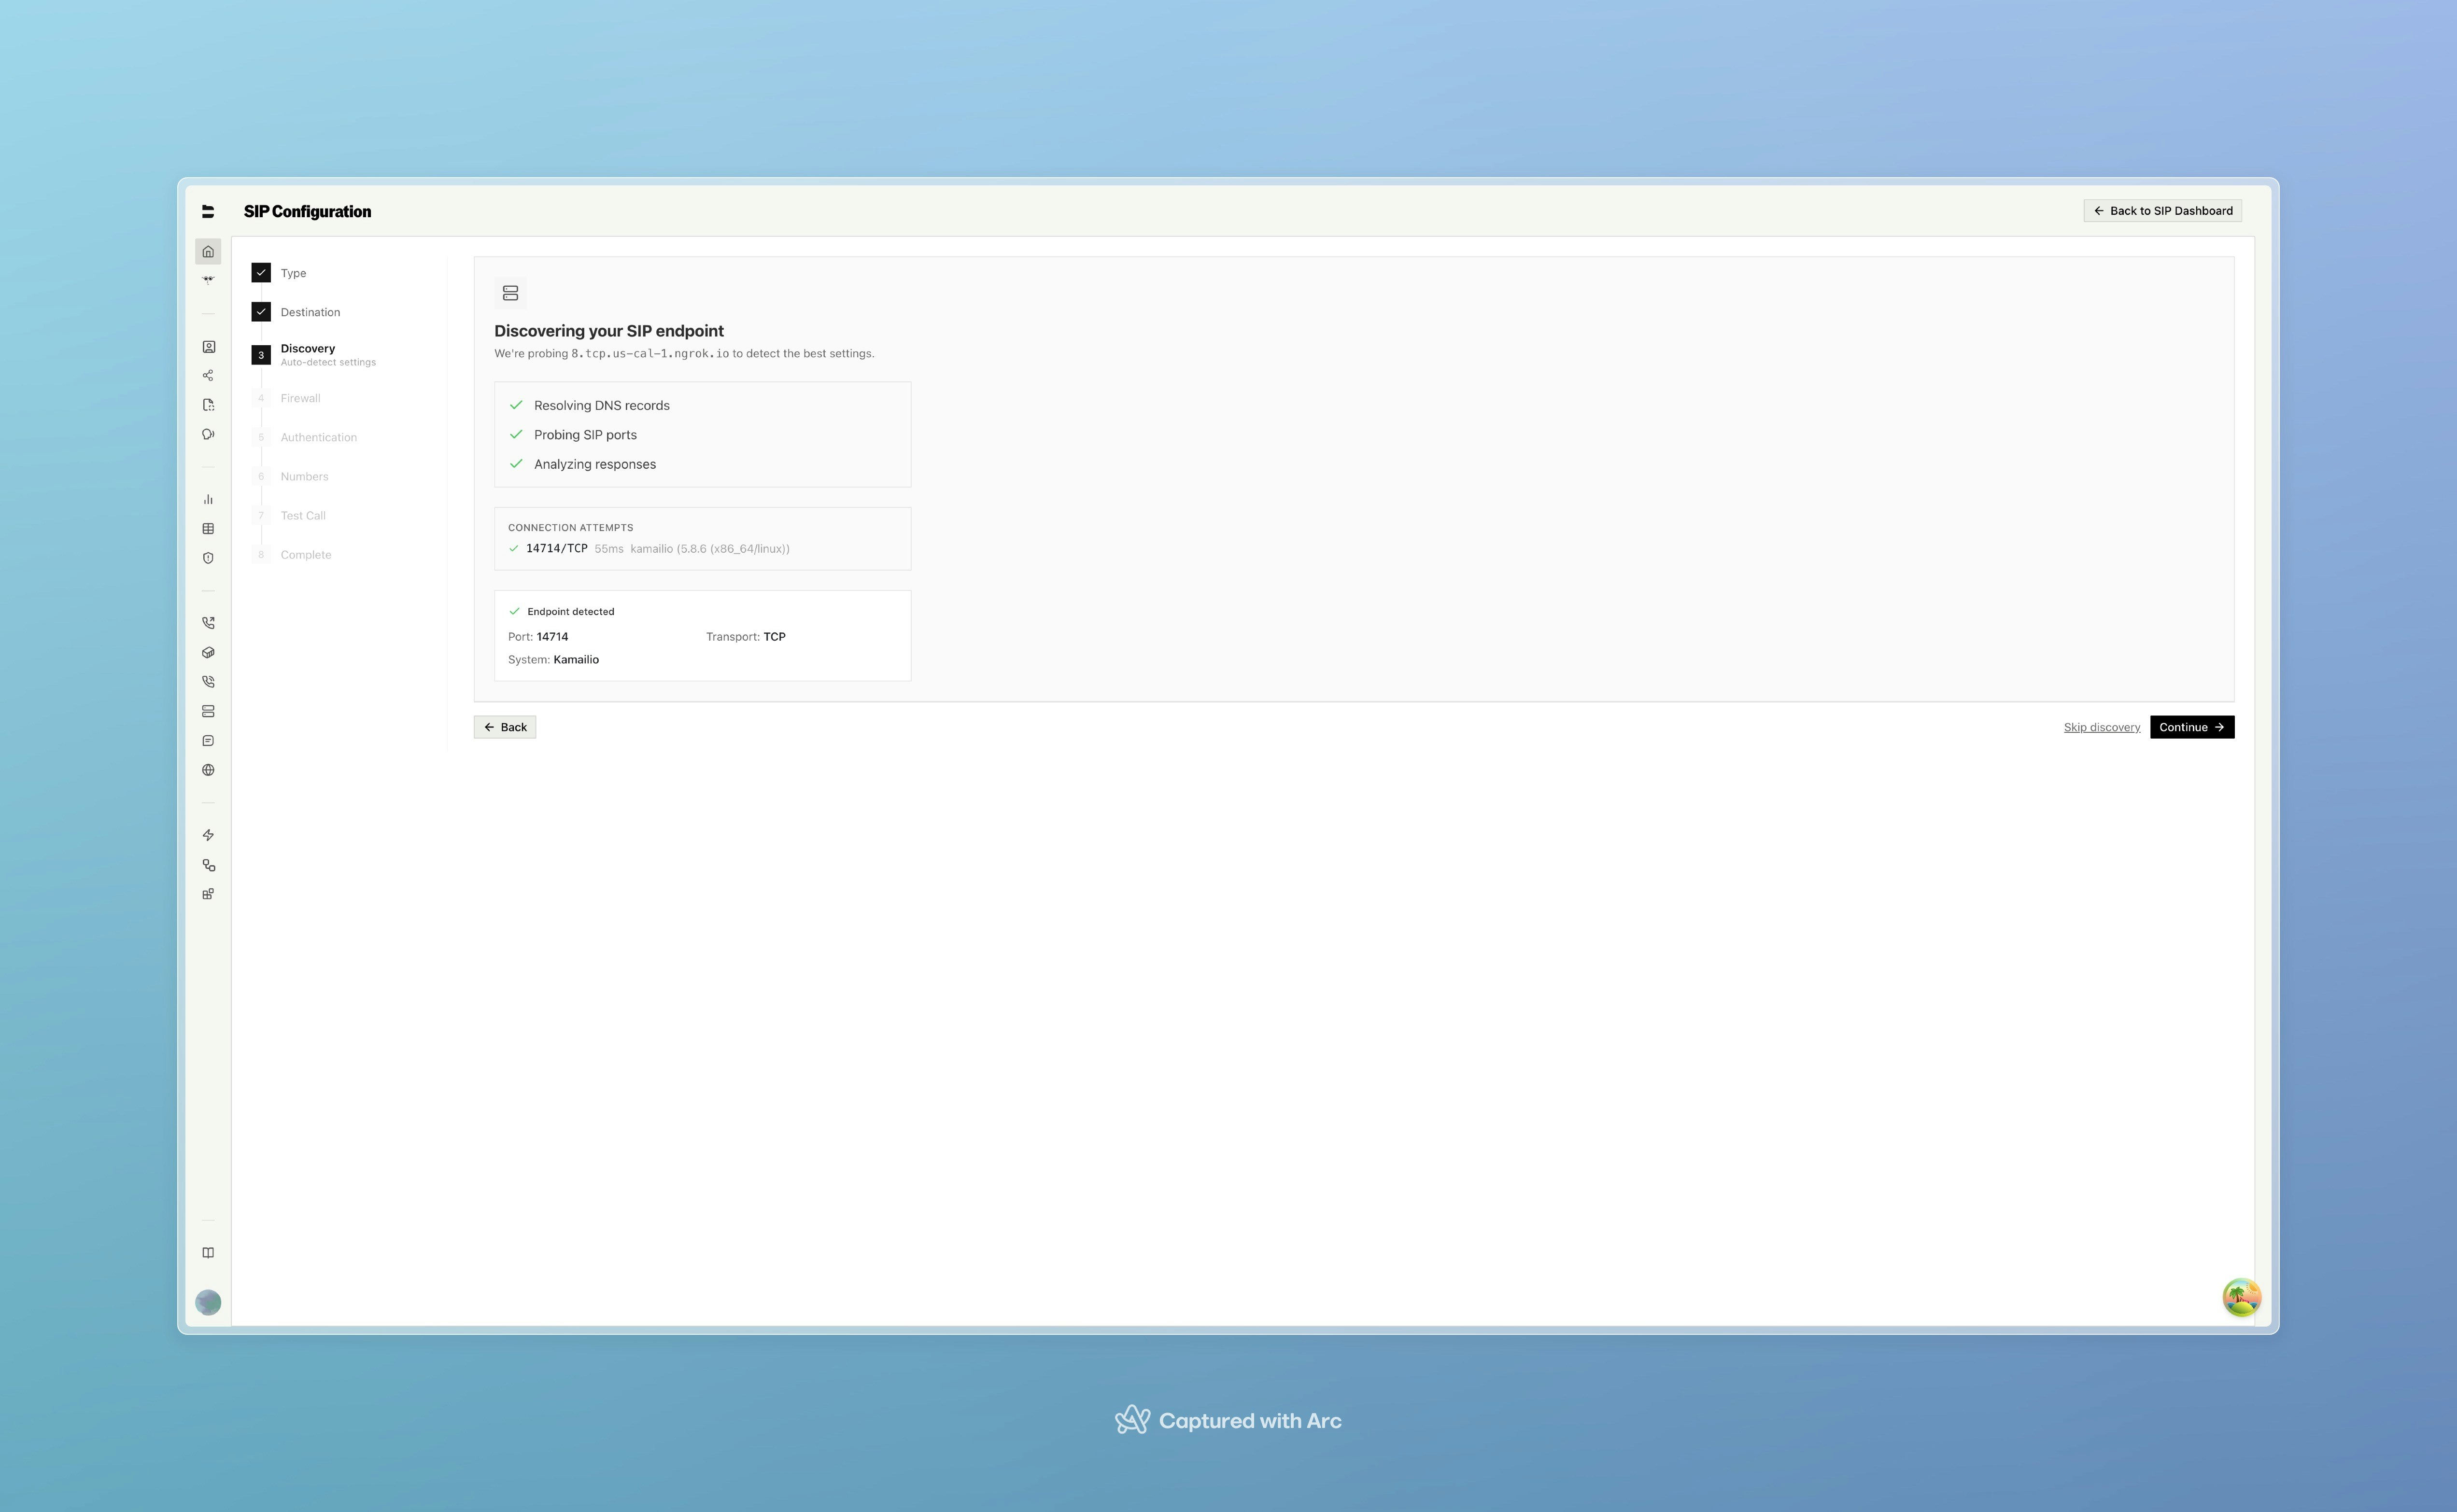
- Resolves DNS — A/AAAA and SRV records (
_sip._udp,_sip._tcp,_sips._tcp) - Probes SIP ports — Tests common ports over UDP, TCP, and TLS with SIP OPTIONS messages
- Analyzes responses — Detects your PBX system (Asterisk, FreeSWITCH, Kamailio, 3CX, Cisco, etc.), supported codecs, and methods
API
API
Run discovery with The
POST /v1/sip/discover. It runs the full probe and returns the result directly:recommended object in the response contains the optimal port, transport, and detected_system. One discovery can run per organization at a time; long-running sessions can also be polled with GET /v1/sip/discover/status.Step 4: Firewall
The wizard displays Bland’s connection endpoints and IP ranges that must be allow-listed in your firewall. See Connection Endpoints below for the full reference.API
API
Retrieve your region’s IPs and ports programmatically with
GET /v1/sip/firewall-ips:Step 5: Authentication
Choose how the two sides authenticate.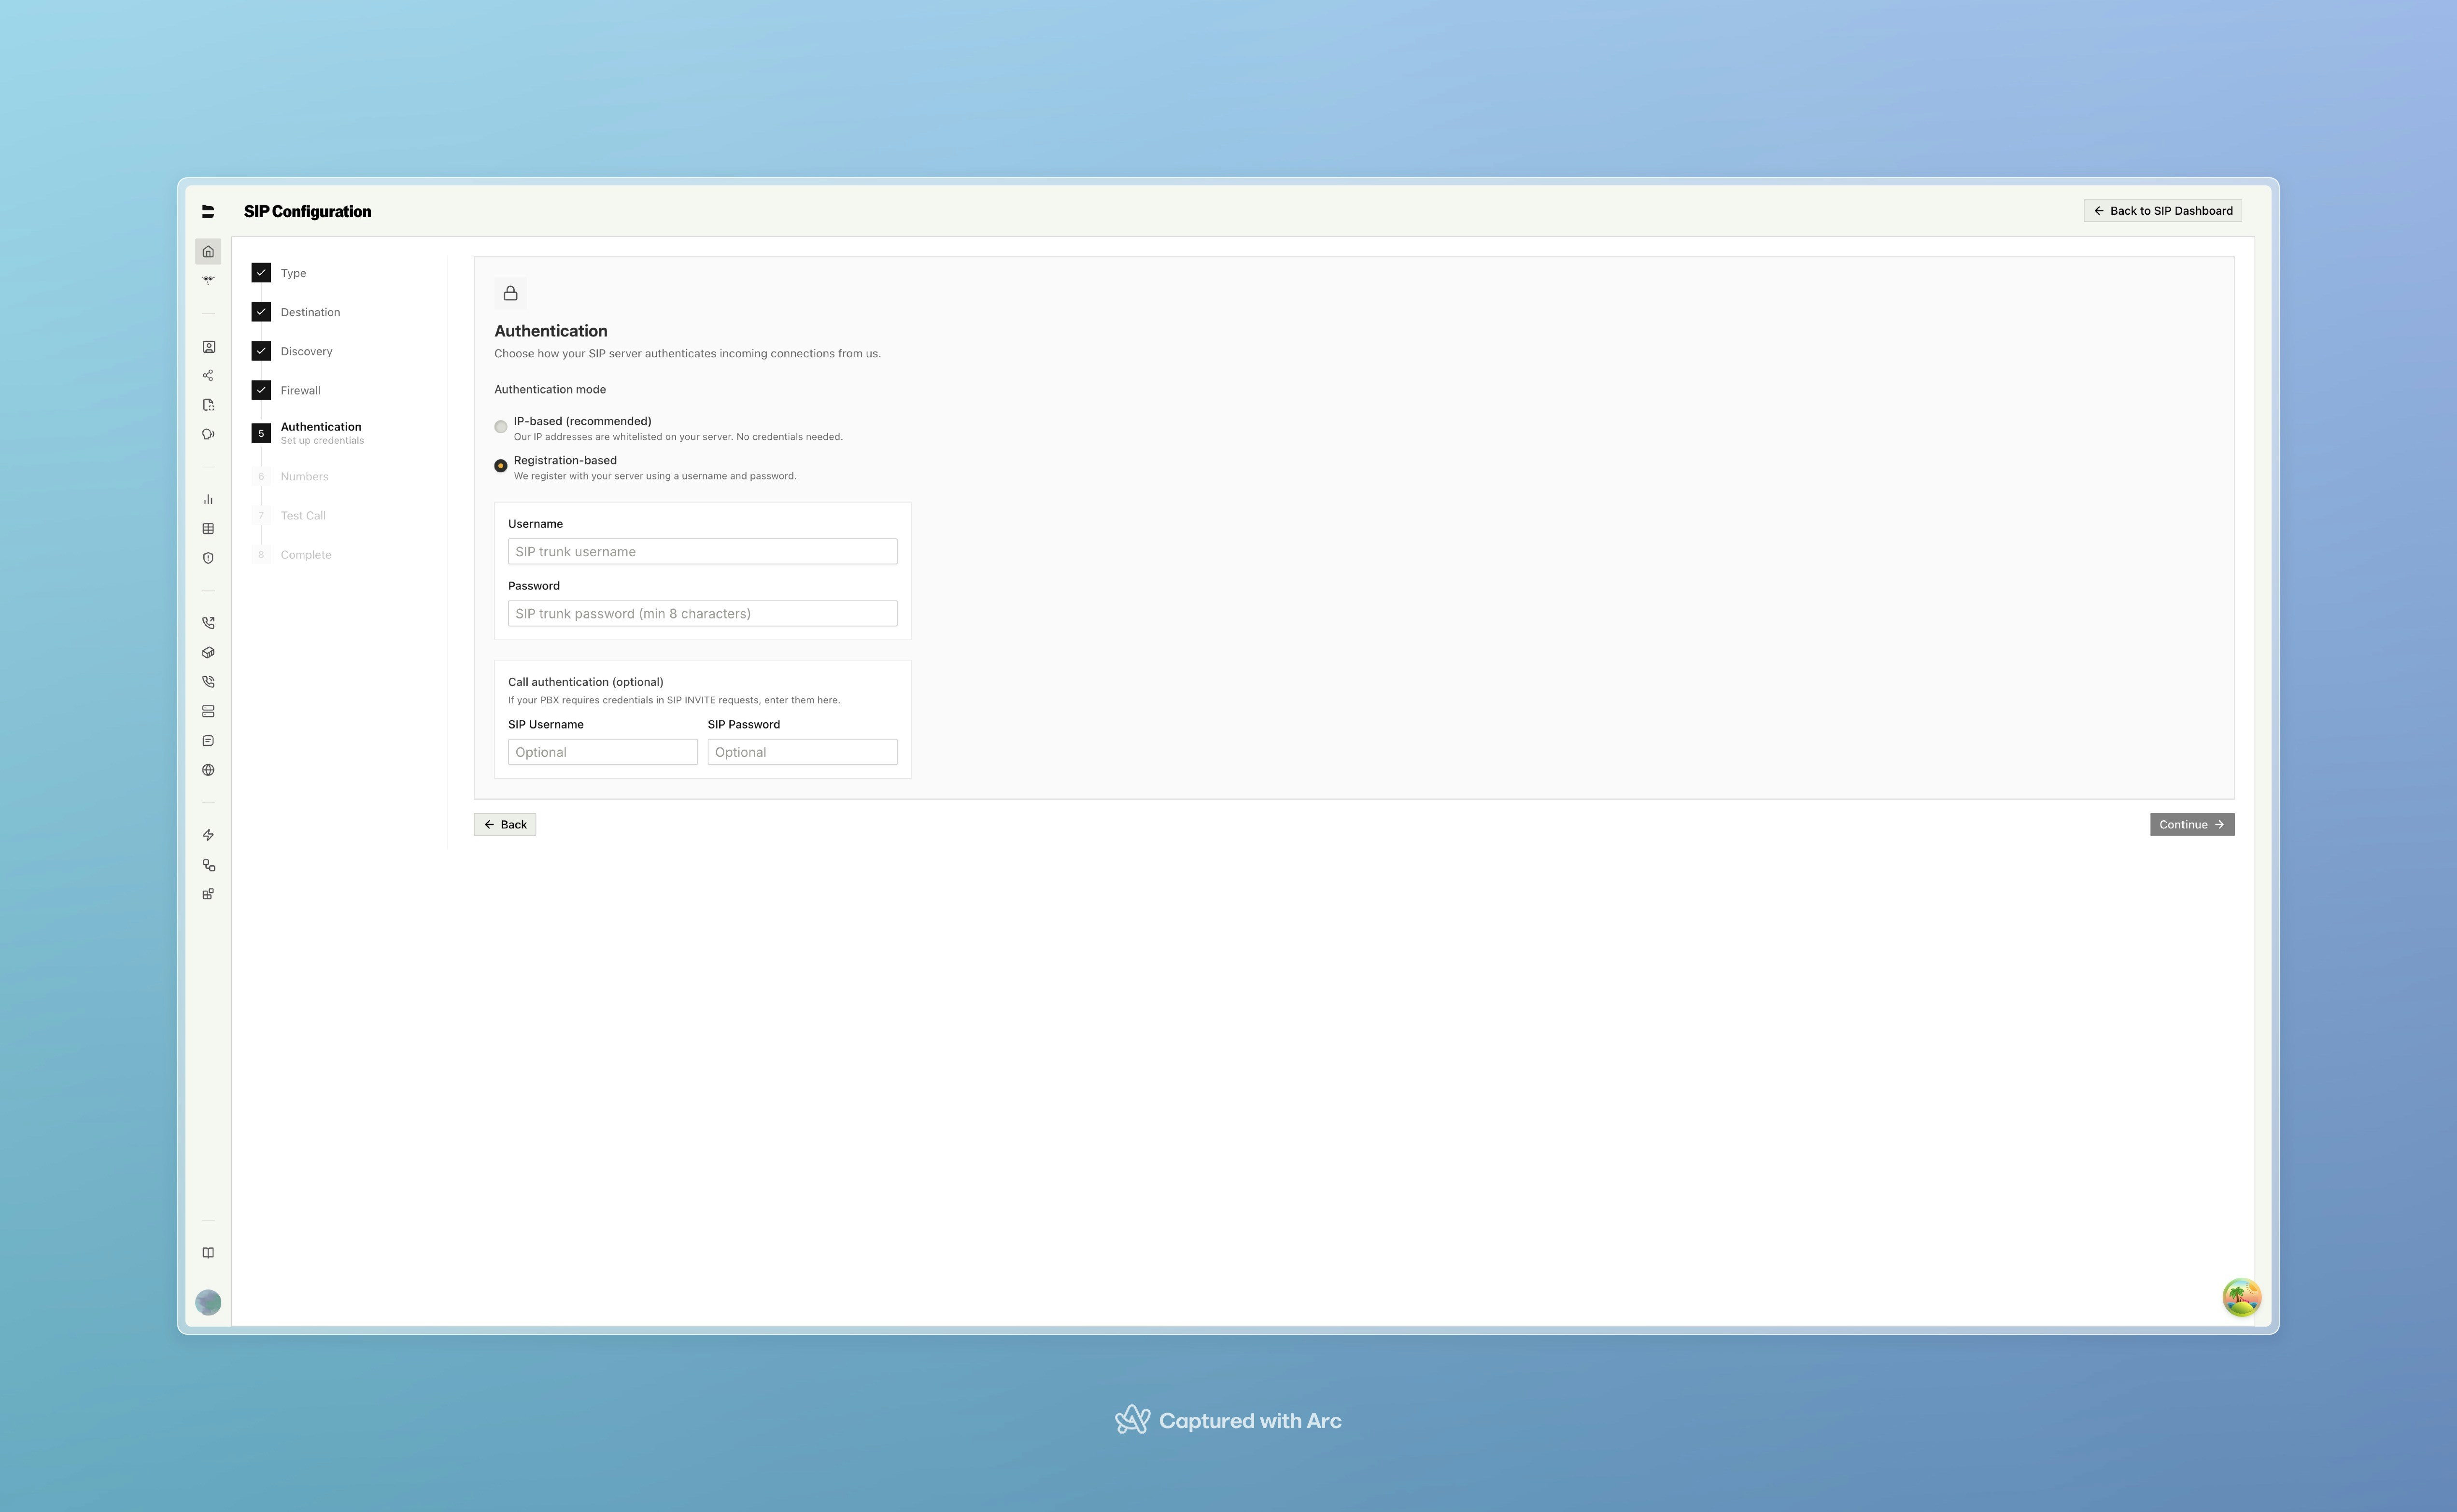
- IP-based (recommended) — Bland’s signaling IPs are allow-listed on your server, and Bland trusts your endpoint by source IP. No credentials to manage.
- Registration-based — Bland registers with your server using a username and password via SIP REGISTER. A derived password is returned that you configure in your PBX.
API
API
Set When REGISTER auth is set, the response includes
auth_mode on the trunk or in the inbound direction of POST /v1/sip/attach:register_password_for_pbx — the one-time derived password to configure in your PBX.Need a password to start from? GET /v1/sip/generate-password returns a strong, PBX-safe one at a configurable length (length 8–256, or strength standard/long).Step 6: Complete
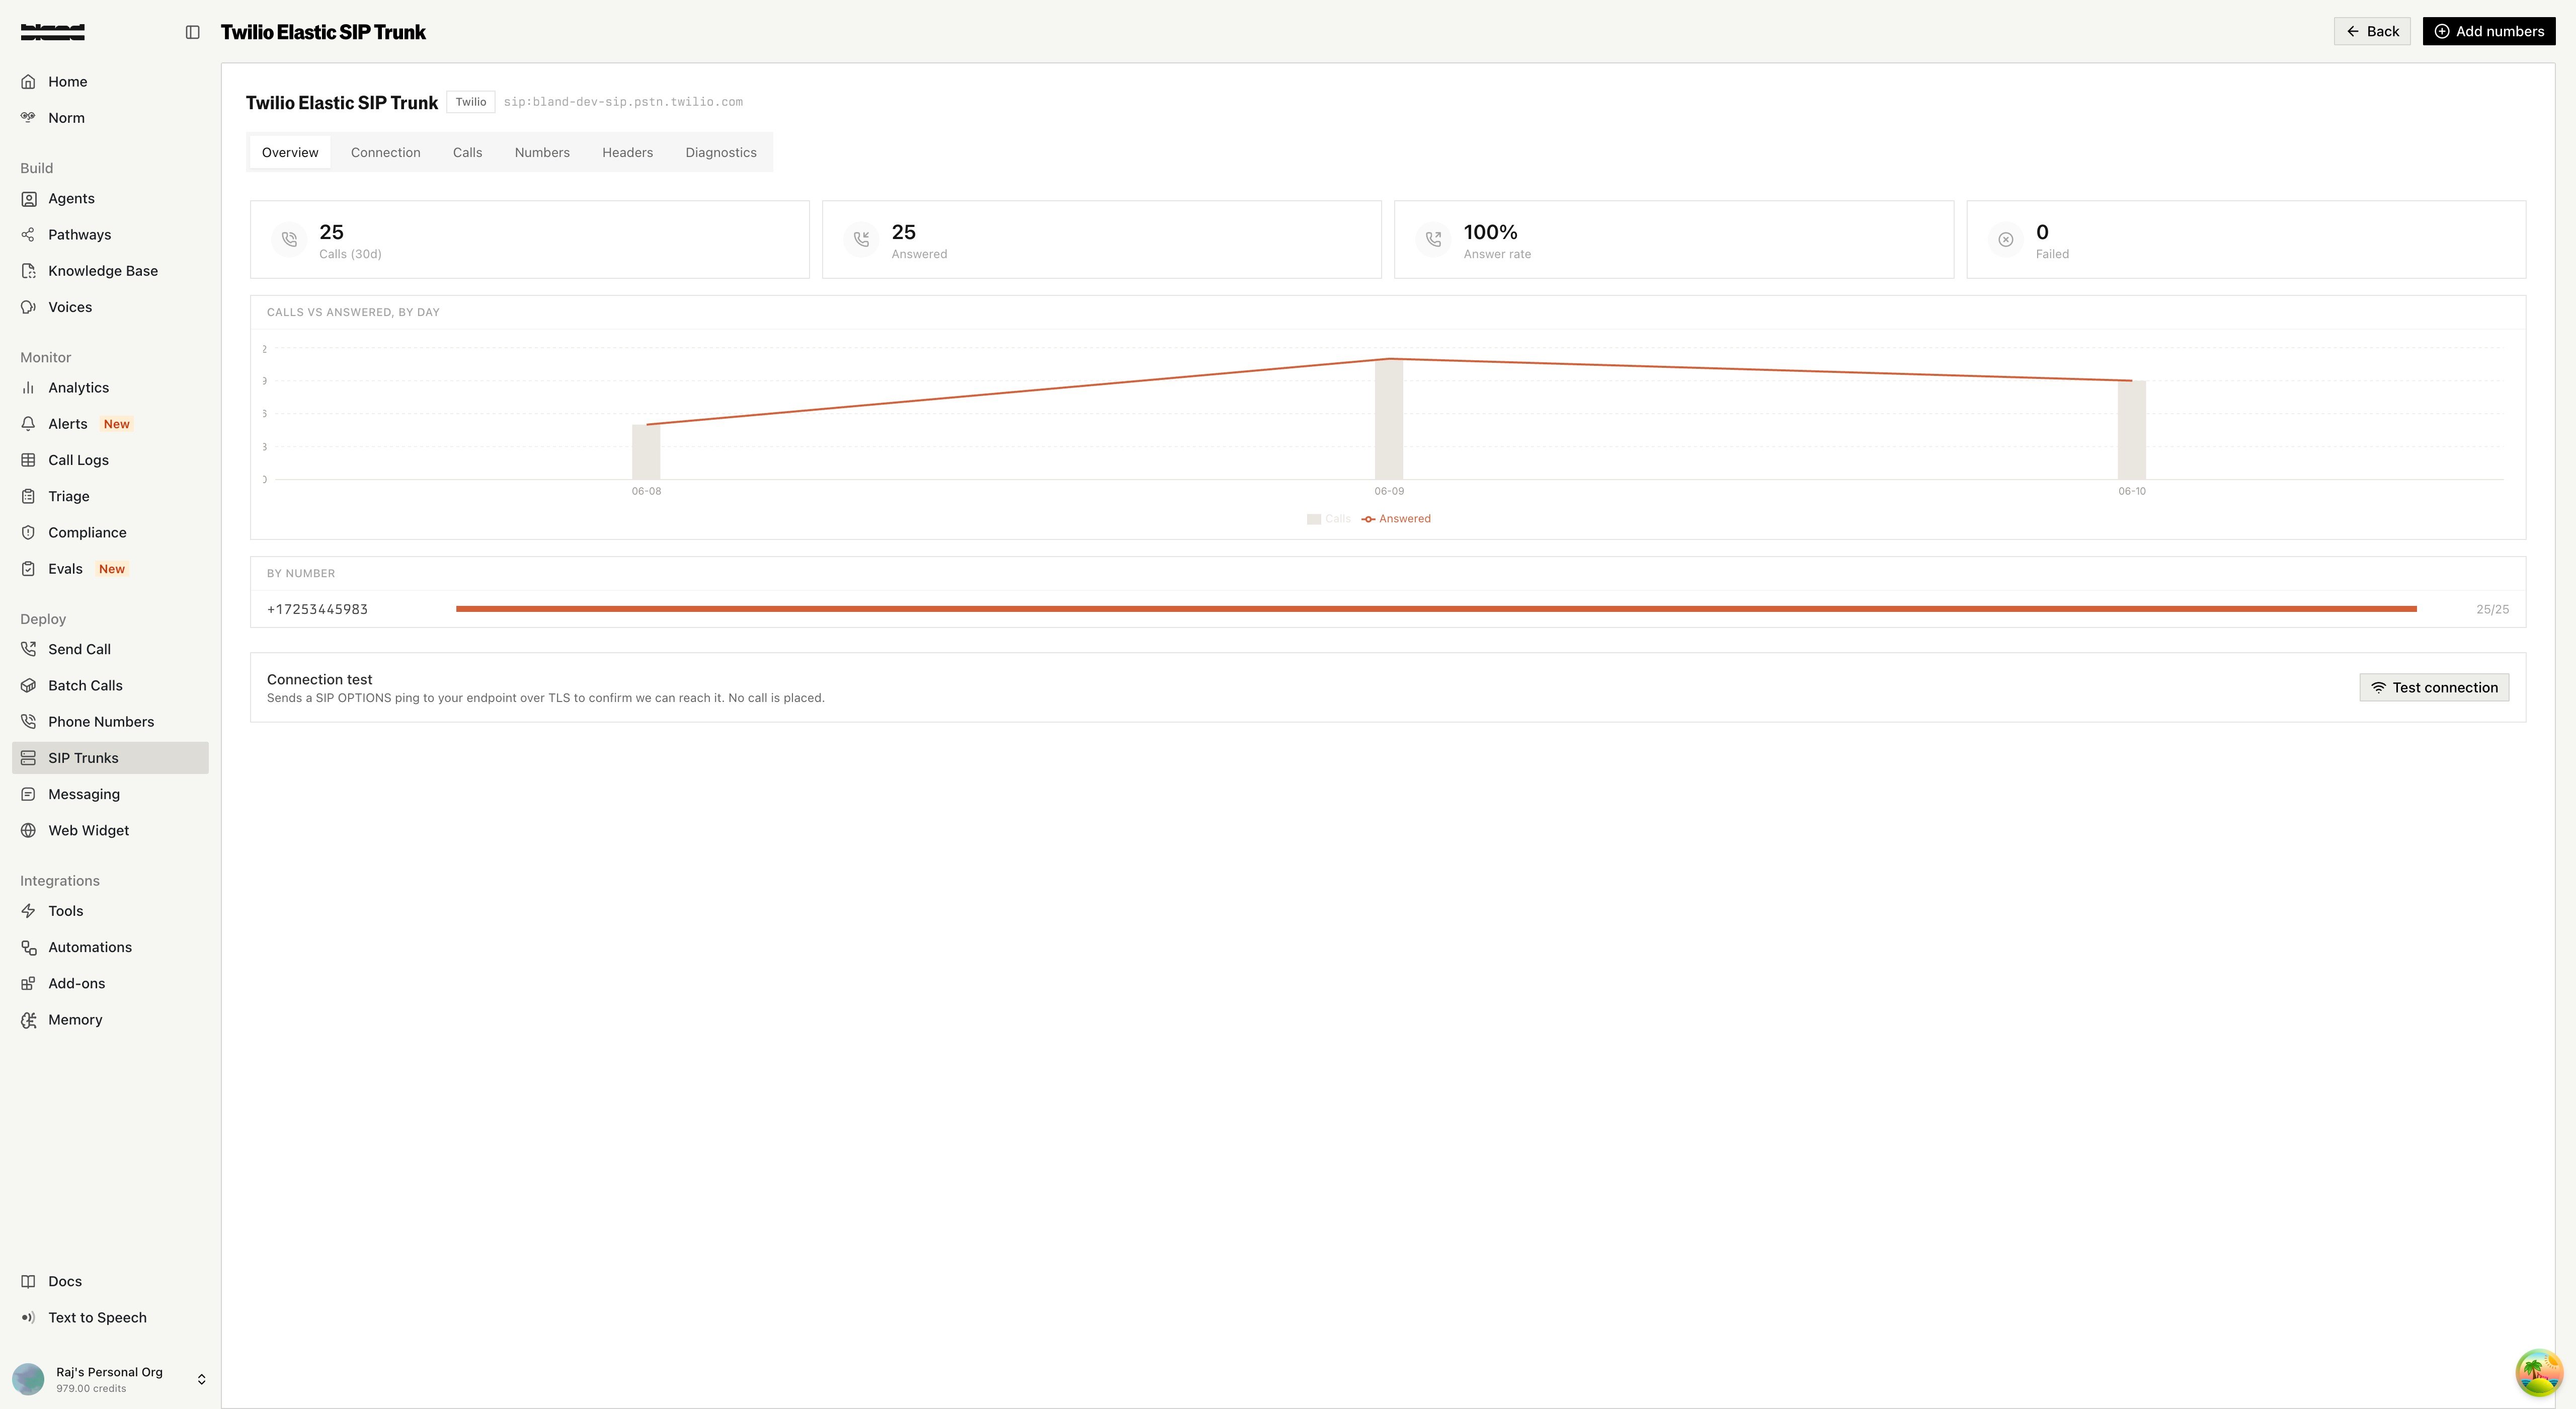
Your trunk is now live. Attach numbers and DIDs from the Numbers tab, verify reachability from the Diagnostics tab, and monitor calls from the Calls tab.API
API
Confirm the trunk and its bound numbers with
GET /v1/sip/trunks/:id, and check per-number health with GET /v1/sip/status:Trunks, Numbers, and DIDs
A trunk is the reusable connection to your SIP infrastructure. You attach numbers and DIDs to it, and they inherit the trunk’s endpoint, transport, and authentication — so you configure the connection once and reuse it across every number.Attach numbers and DIDs
Bind numbers to a trunk withPOST /v1/sip/attach. You can attach up to 100 at once.
- PSTN numbers are normalized to E.164 (e.g.
+14155550100). - DIDs and extensions — when a number is bound to a trunk (
trunk_id), non-E.164 SIP identities such as DIDs and dial-plan extensions (e.g.2001) are accepted and stored as-is. - Each number can carry an inbound and an outbound configuration independently.
configured (successful) from failed (with per-number error reasons). Outbound endpoint and authentication are inherited from the trunk, so you don’t repeat them per number.
Inbound numbers
Inbound SIP numbers behave like any other Bland inbound number — configure their pathway, persona, voice, and other settings exactly as you would a regular inbound number. Set them up through the wizard, the trunk’s Numbers tab, orPOST /v1/sip/attach.
Inspect a call (SIP trace)
Open a trunk’s Calls tab and select a call to see the full SIP trace — every message across every leg, as a sortable table or a ladder (PCAP) diagram.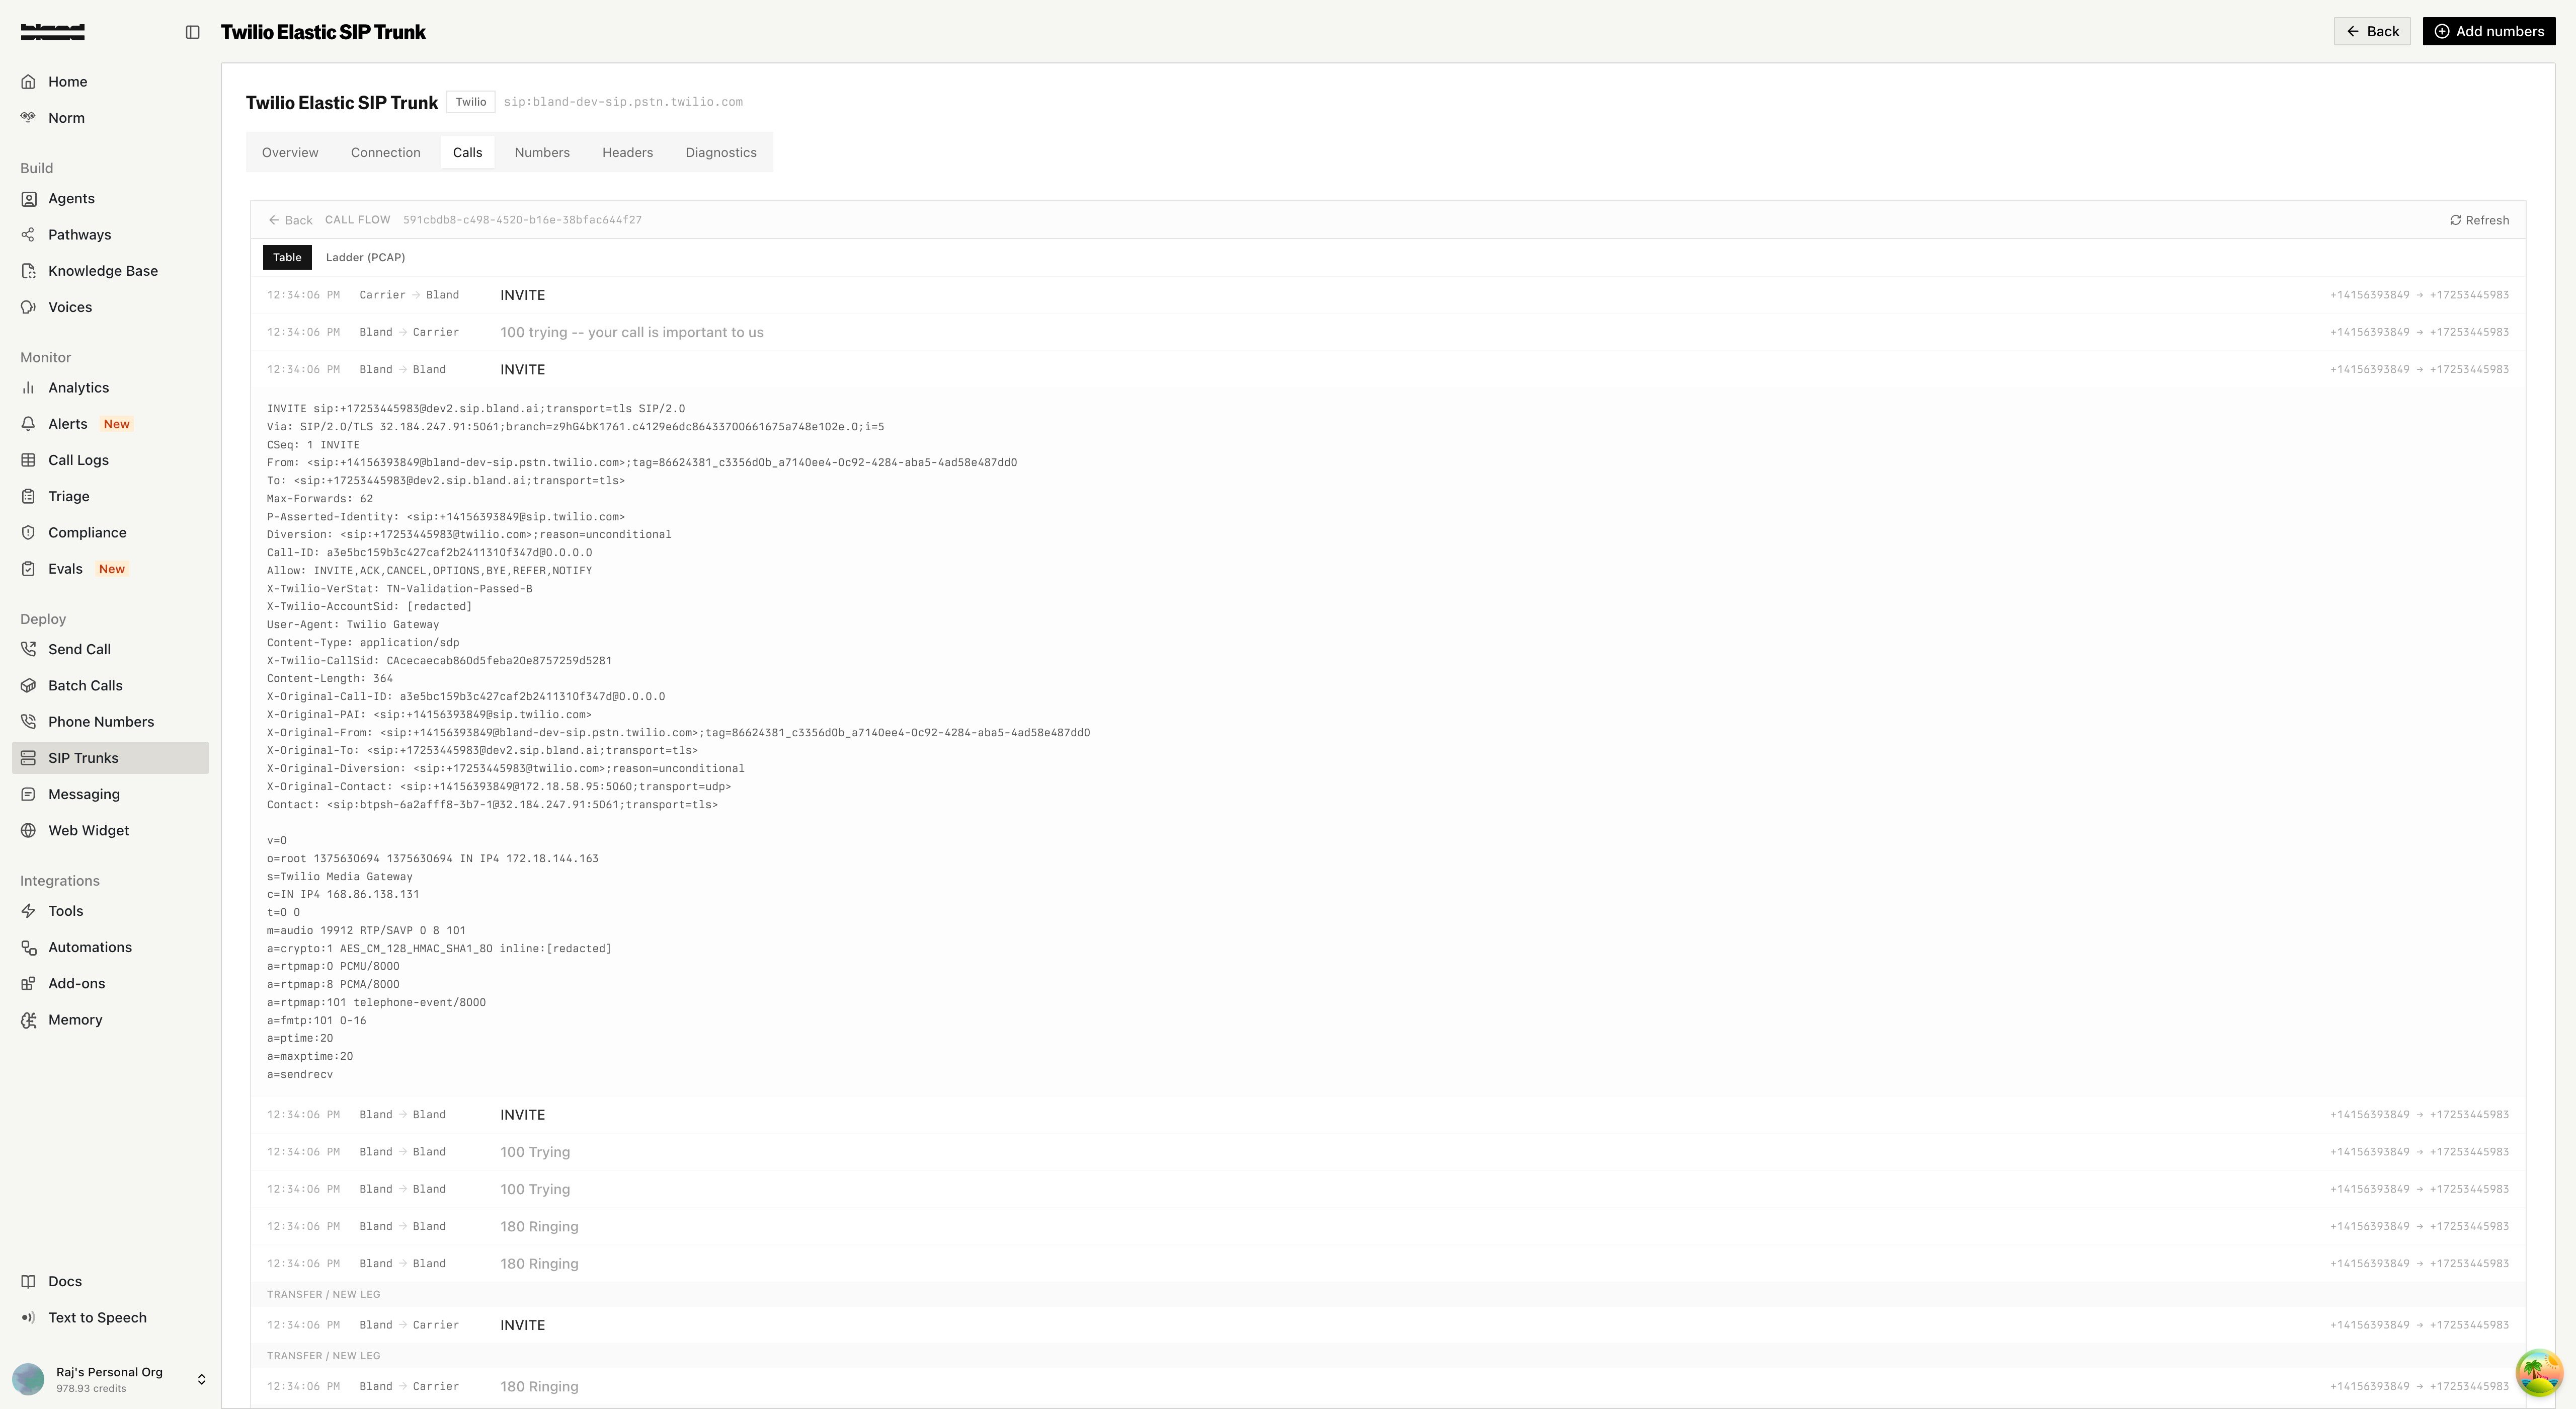
Advanced configuration
From a number’s configuration you can also manage:- Failover — primary, secondary, and tertiary SIP servers with automatic failover triggers (unreachable, auth failure, timeout) and failback mode (auto/manual).
- Codecs — reorder and enable/disable codecs (PCMU, PCMA, Opus, G.722, G.729) with optional transcoding.
- Alerts — thresholds for unreachable duration, failure rate, and response time, with email, SMS, and webhook channels.
PATCH /v1/sip/config.
Number Porting
Bland supports number porting — transferring phone numbers you own from another carrier to Bland. This lets you use your existing business numbers directly with Bland’s SIP infrastructure without maintaining a separate SIP provider.How Number Porting Works
Number porting is a regulated process coordinated between carriers. It typically takes 7–14 business days depending on the losing carrier and number type. The process follows these stages:| Status | Description |
|---|---|
waiting_for_signature | Port request created. A Letter of Authorization (LOA) needs to be signed. |
submitted | LOA signed and submitted to the losing carrier. |
in_progress | The losing carrier is processing the port. |
completed | Numbers have been ported successfully and are active on Bland. |
canceled | The port request was canceled. |
failed | The port request failed (e.g., incorrect account information). |
Porting via the Dashboard
Click “Port a number” on the SIP Dashboard to launch the porting wizard. Step 1: Enter Numbers Enter the phone numbers you want to port and click “Check portability” to verify they can be transferred.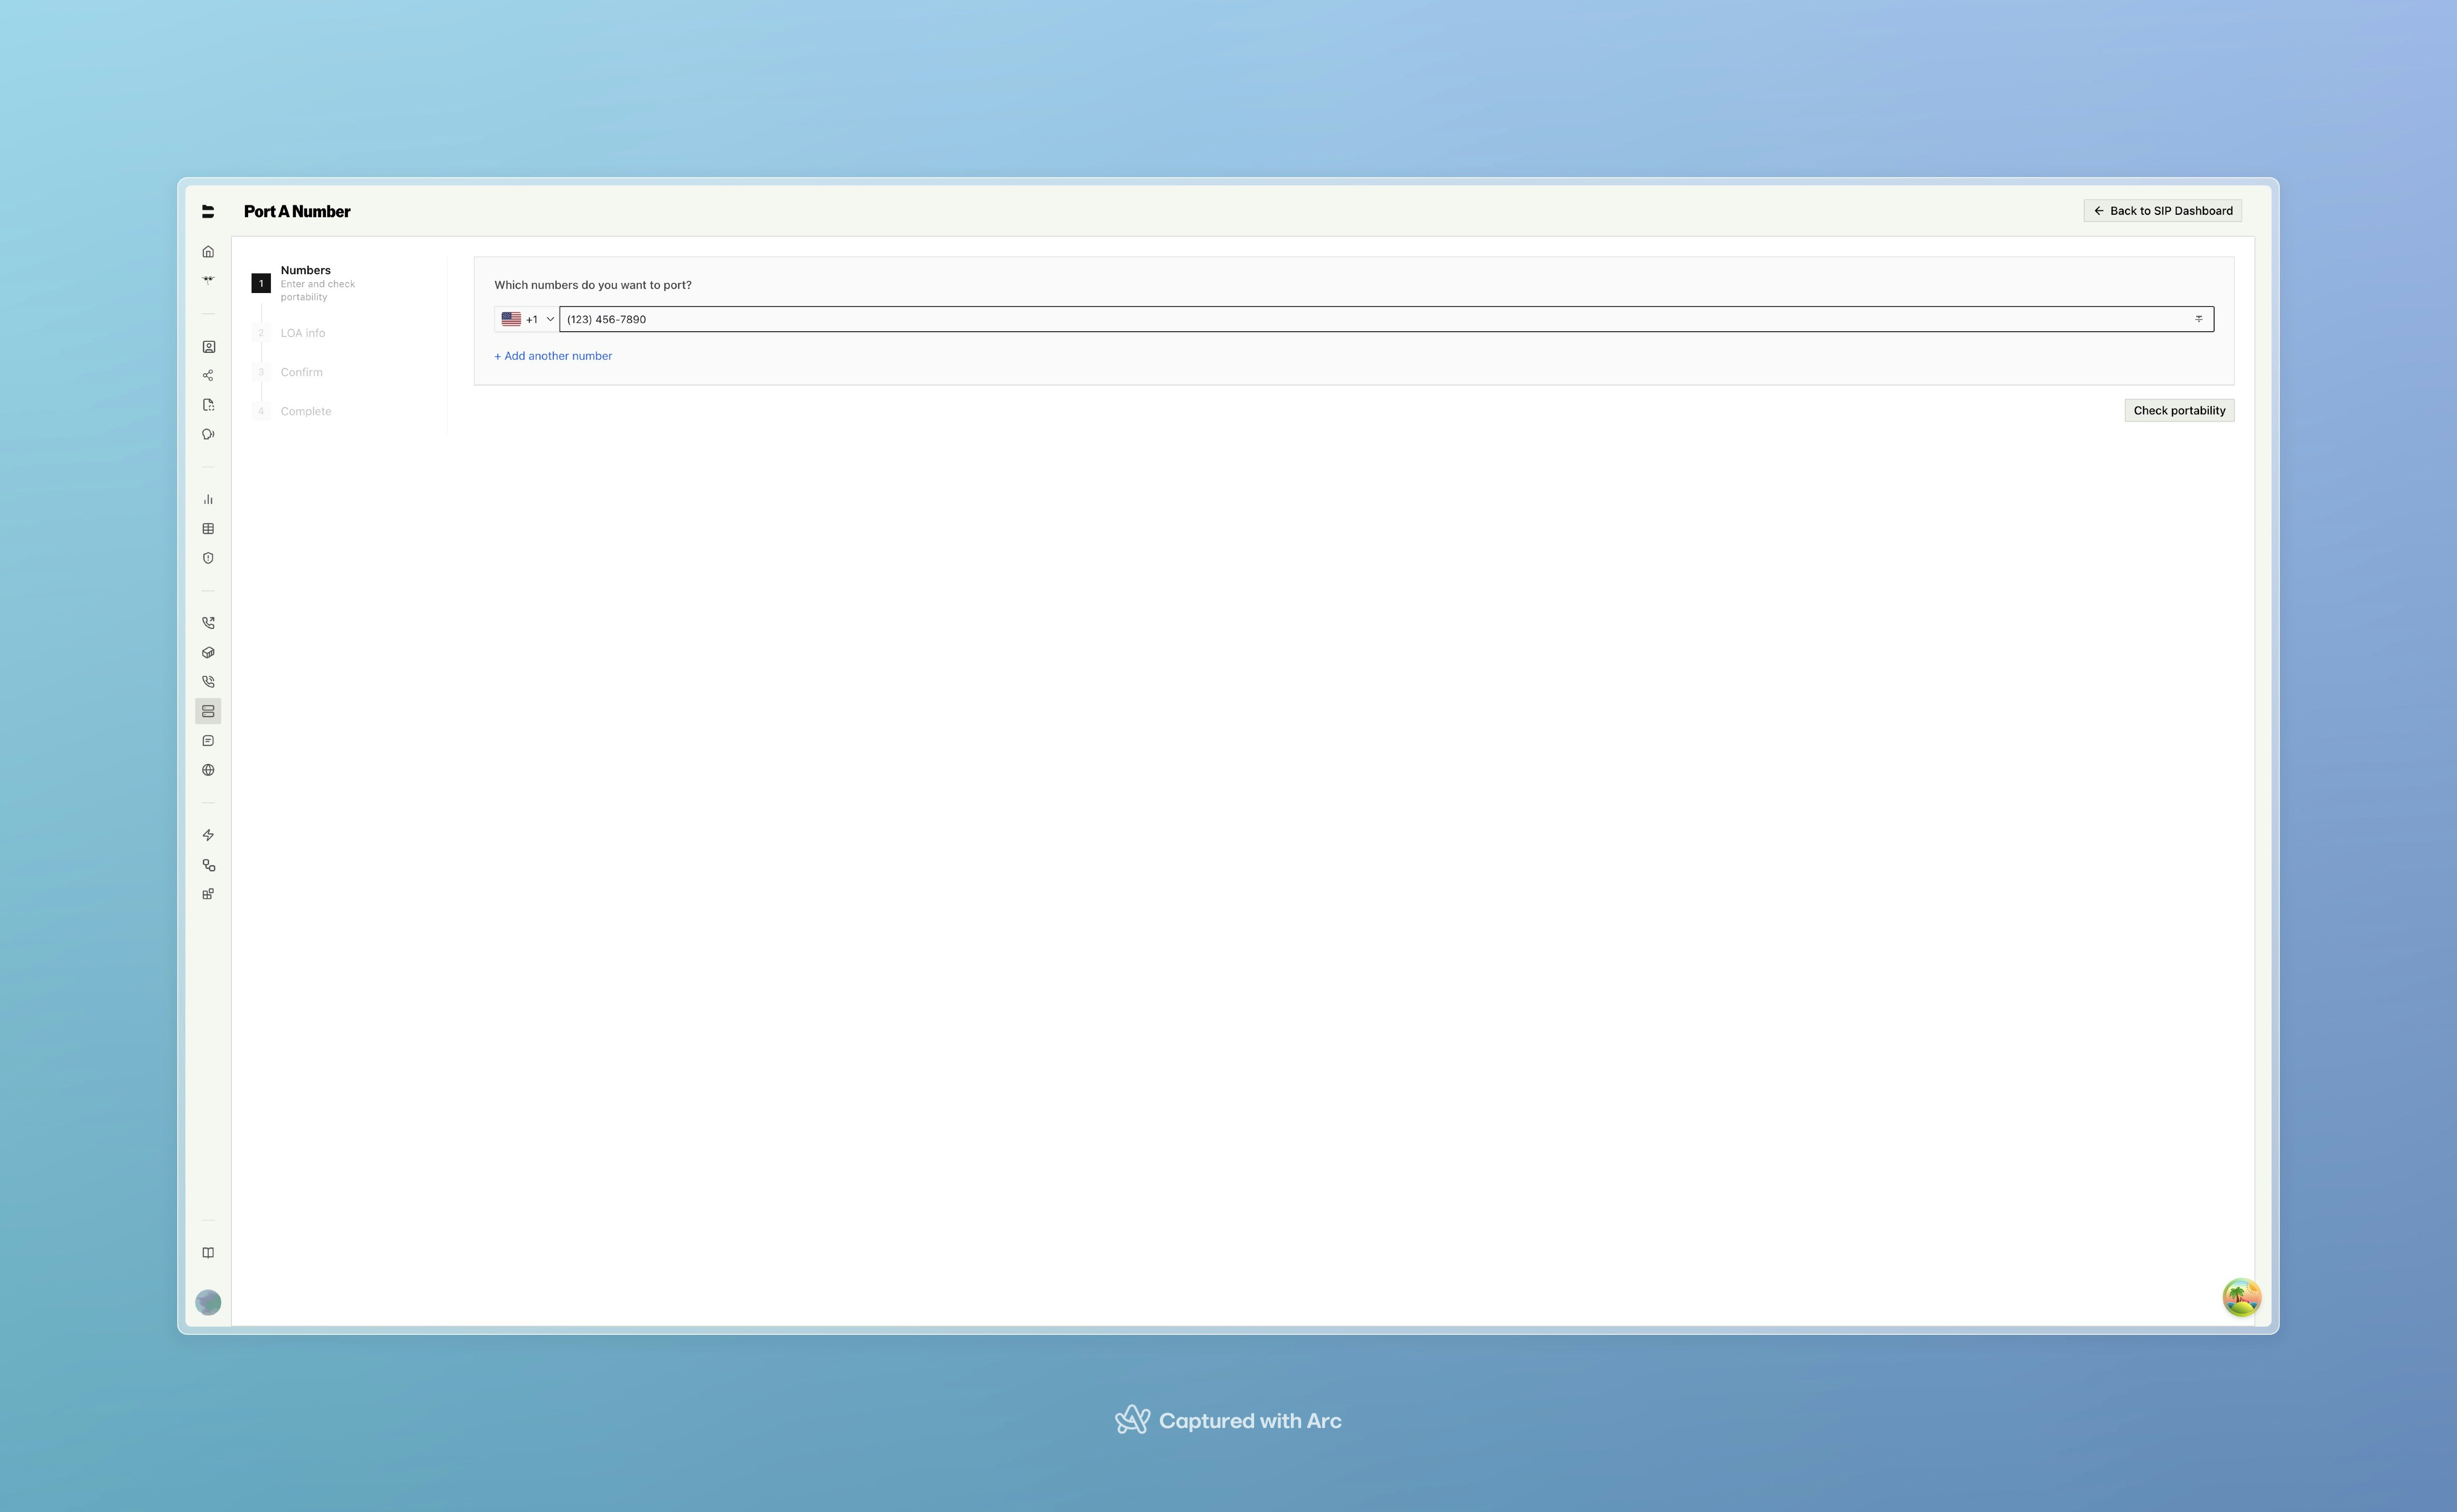
API
API
Check portability with Returns
GET /v1/sip/port/check:portable (boolean), number_type, and pin_required for each number.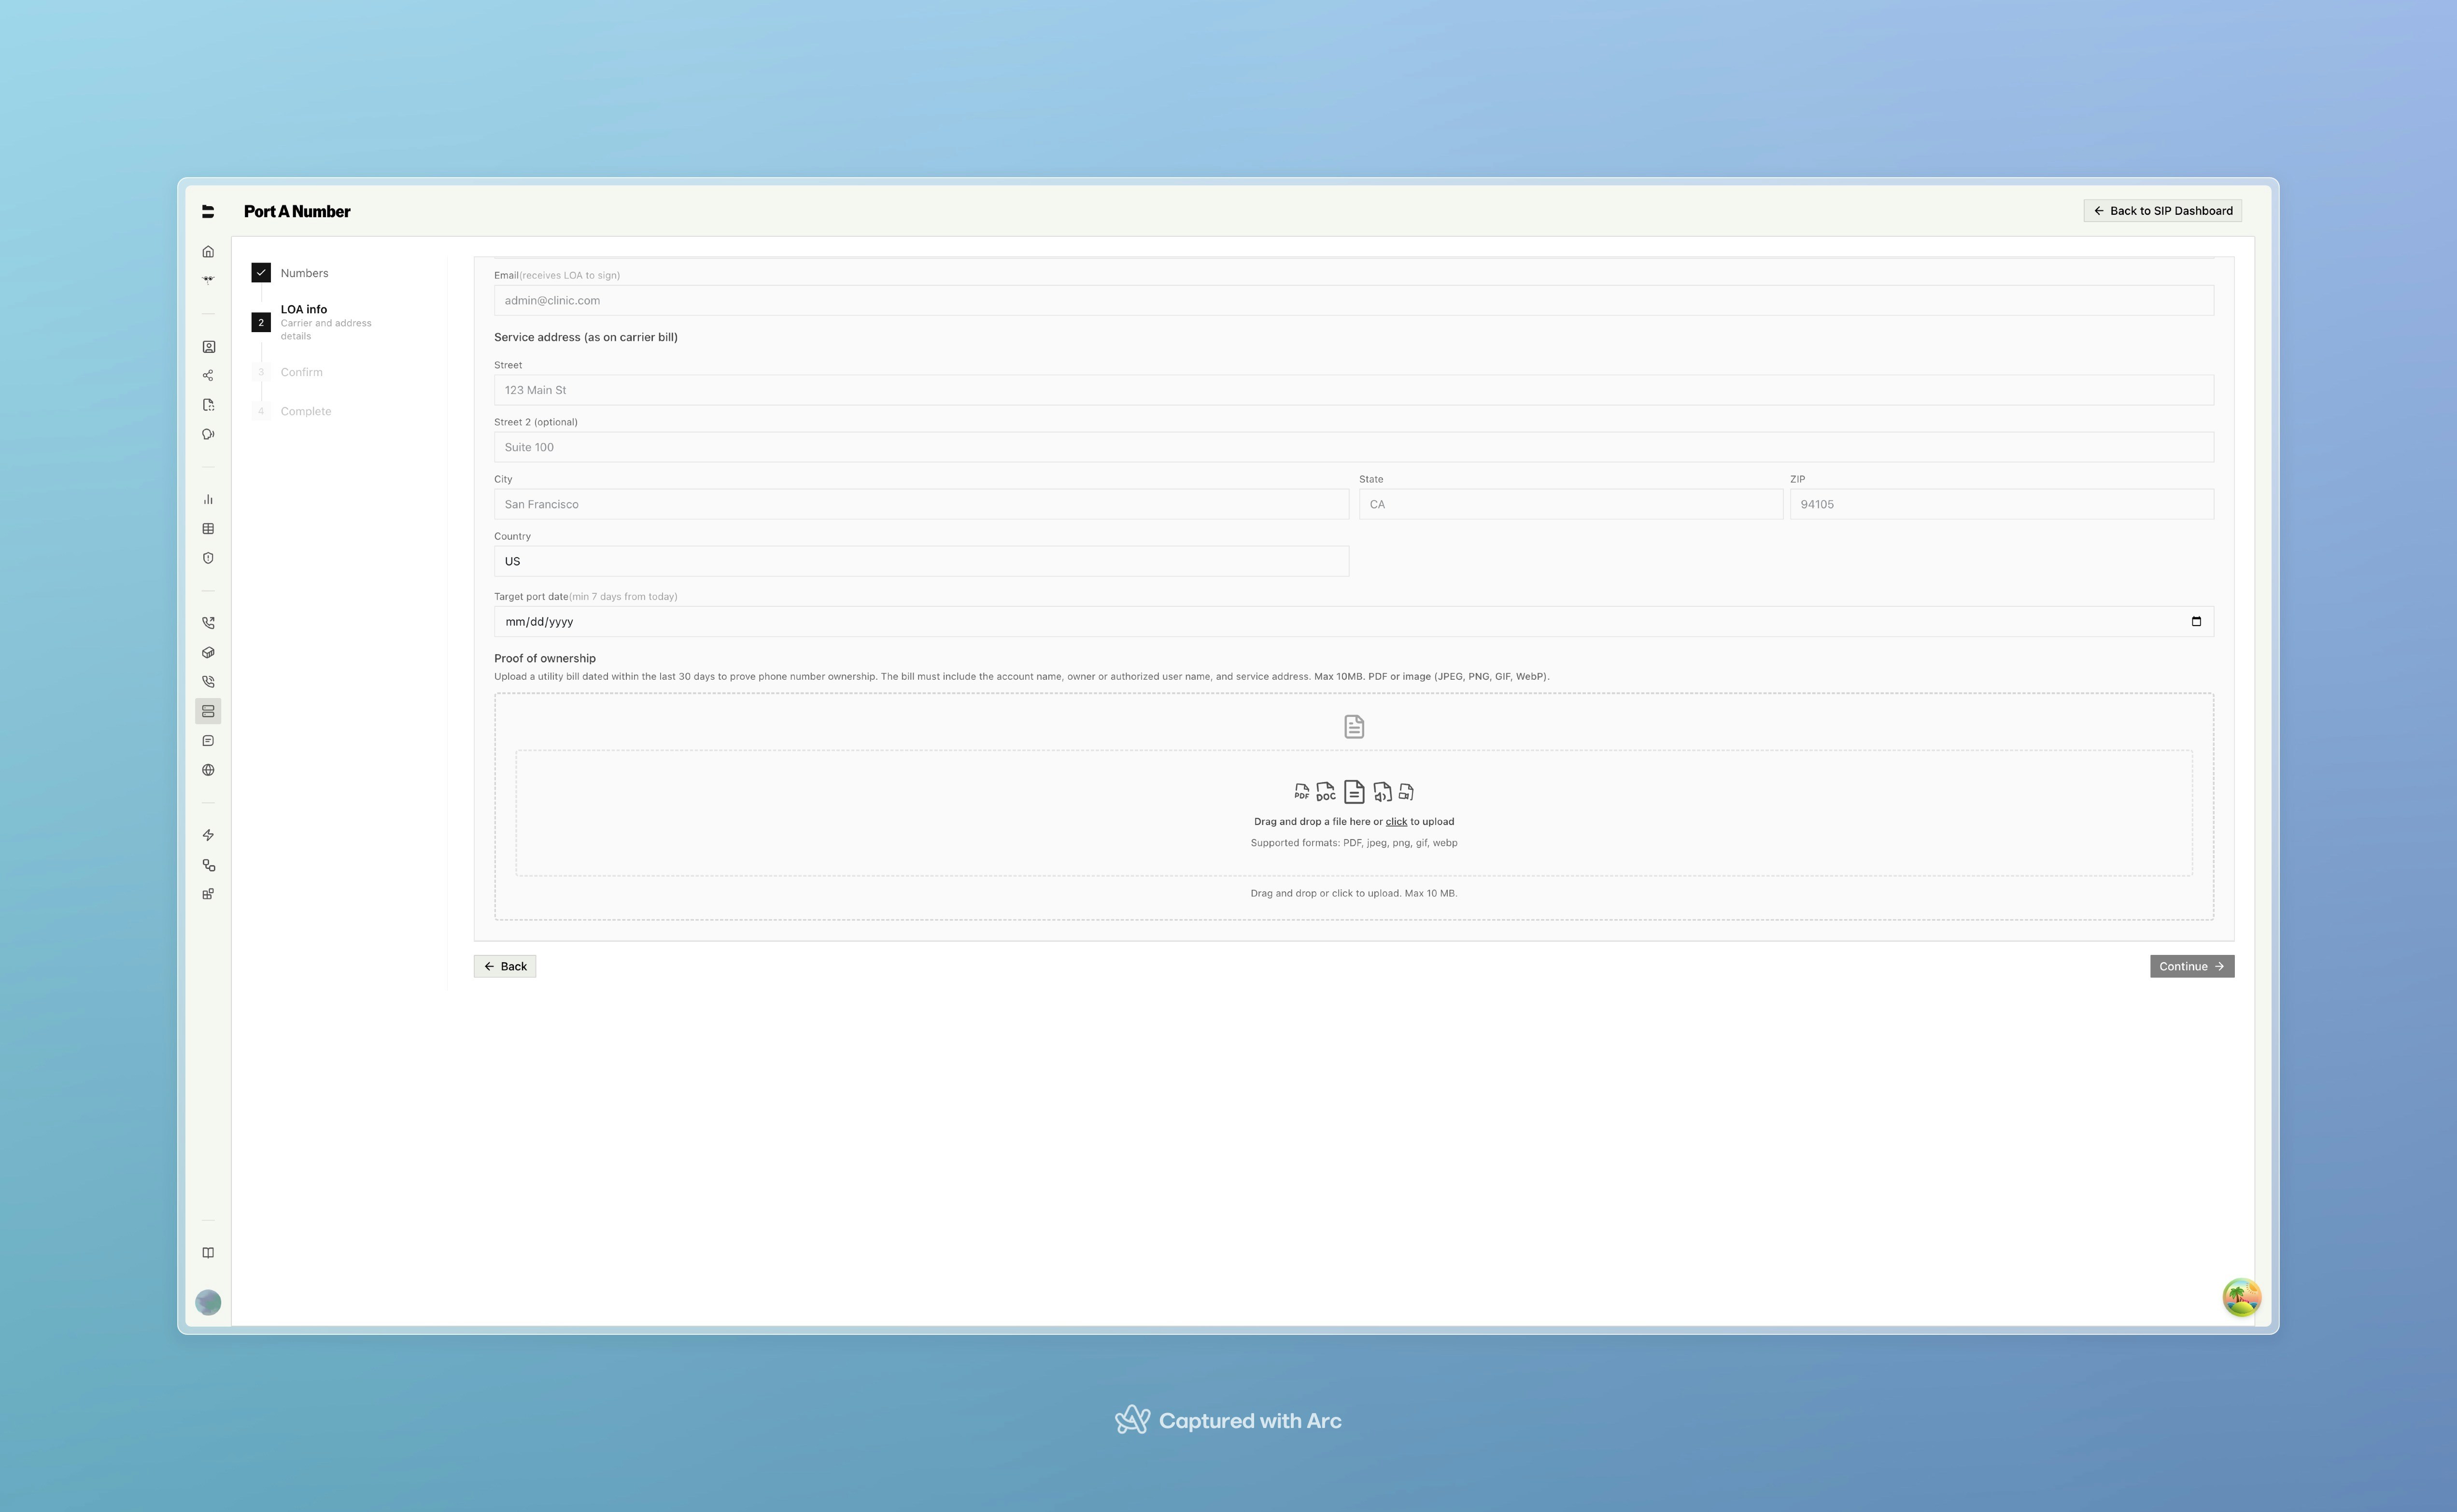
- Authorized representative — Name and email of the person authorized to port the numbers
- Service address — The address on file with the losing carrier (must match their records)
- Target port date — Earliest date for the port (minimum 7 days from today)
- Proof of ownership — Upload a utility bill or carrier invoice (PDF or image, max 10MB) showing the account name and service address
API
API
Upload your proof of ownership document with Returns a
POST /v1/sip/port/document:document_sid to reference when initiating the port.API
API
Submit the port request with Track progress with
POST /v1/sip/port/initiate:GET /v1/sip/port or cancel with DELETE /v1/sip/port/:id.Connection Endpoints
Bland operates regional SIP edges. Connect to the endpoint closest to your infrastructure, and allow-list both its signaling and media IPs in your firewall. These IPs are static and do not change. Bland separates signaling from media, and they use different IP addresses:- Signaling (connection): SIP runs exclusively over TLS on TCP port 5061 — there is no plaintext UDP/5060 listener. Each region has two signaling IPs (one per availability zone) behind its FQDN for high availability; send SIP to the FQDN and it balances across both.
- Media (RTP): Audio is carried over SRTP on a separate set of media IPs per region, over UDP ports 16384–32768.
| Region | Endpoint (TLS 5061) | Signaling IPs | Media IPs (RTP) |
|---|---|---|---|
| United States | us2.sip.bland.ai | 35.82.60.77, 52.27.163.2 | 52.13.231.129, 35.160.144.213, 44.234.13.26, 54.218.96.252 |
| Canada | ca2.sip.bland.ai | 15.156.129.66, 15.157.196.128 | 3.96.68.79, 35.183.80.246, 52.60.169.171, 16.54.43.127 |
| Asia-Pacific | asia2.sip.bland.ai | 32.236.162.210, 3.104.20.26 | 3.104.151.70, 15.134.58.75, 52.62.109.3, 54.79.10.189 |
| Europe | eu2.sip.bland.ai | 52.17.235.44, 34.250.51.24 | 3.248.61.228, 54.194.194.135, 52.215.80.226, 108.132.103.51 |
us2.sip.bland.ai:5061;transport=tls.
Firewall allow-list
Open TLS 5061 to the signaling IPs and UDP 16384–32768 to the media IPs for your region. You can also copy the list from the Firewall & Ports panel on the trunk page, or fetch it withGET /v1/sip/firewall-ips.
Whitelisting is mutual: Bland allow-lists your source ranges, and you allow-list Bland’s signaling and media IPs. Open RTP (UDP 16384–32768) to the media IPs in addition to TLS 5061 to the signaling IPs, or audio will not flow.
Requirements and Security
Transport- SIP signaling: TLS 1.2 or higher, TCP port 5061 only. UDP and plaintext 5060 are not accepted.
- Ensure the Let’s Encrypt ISRG Root X1 CA is installed — downloadable here.
- SRTP using
AES_CM_128_HMAC_SHA1_80. - RTP over UDP ports 16384–32768; RTCP uses RTP port + 1.
- PCMU (G.711 μ-law), PCMA (G.711 A-law), Opus, G.722
- G.729 available via advanced configuration
- Methods:
INVITE,ACK,BYE,CANCEL,OPTIONS,REFER - DTMF: RFC 2833 (out-of-band via RTP telephone-event)
- Number format: E.164 for PSTN; DIDs and extensions supported on trunk-bound numbers
- Authentication: IP-based (default) or SIP REGISTER digest auth
Entitlement Requirement
All/v1/sip endpoints are protected by an entitlement check. Your organization must have the SIP entitlement enabled — contact support to enable it for your Enterprise organization.
API Reference
All SIP endpoints are under/v1/sip and require authentication via your API key. Per-endpoint parameter documentation is available in the API Reference tab.
Trunk Management
| Method | Endpoint | Description |
|---|---|---|
POST | /v1/sip/trunks | Create a reusable trunk |
GET | /v1/sip/trunks | List trunks |
GET | /v1/sip/trunks/:id | Get a trunk and its attached numbers |
PATCH | /v1/sip/trunks/:id | Update a trunk |
DELETE | /v1/sip/trunks/:id | Delete a trunk |
POST | /v1/sip/trunks/:id/test-connection | Send a SIP OPTIONS reachability ping |
Numbers & Configuration
| Method | Endpoint | Description |
|---|---|---|
GET | /v1/sip | Get SIP config for a phone number |
POST | /v1/sip/attach | Attach numbers and DIDs to a trunk / config |
POST | /v1/sip/update | Update one direction’s settings |
POST | /v1/sip/detach | Remove SIP configuration |
GET | /v1/sip/numbers | List all SIP-configured numbers |
GET | /v1/sip/generate-password | Generate a strong SIP password (configurable length) |
PATCH | /v1/sip/config | Advanced config (failover, codecs, alerts) |
Discovery & Testing
| Method | Endpoint | Description |
|---|---|---|
POST | /v1/sip/parse-destination | Parse and validate a SIP destination |
POST | /v1/sip/discover | Auto-discover SIP endpoint settings |
GET | /v1/sip/discover/status | Poll discovery progress |
POST | /v1/sip/test-call | Send a test call to your SIP endpoint |
GET | /v1/sip/test-call/status | Get test call status and trace |
Monitoring
| Method | Endpoint | Description |
|---|---|---|
GET | /v1/sip/firewall-ips | Get Bland’s IP addresses and ports |
GET | /v1/sip/outbound-setup | Get outbound SIP server details for PBX config |
GET | /v1/sip/status | Get trunk health status |
GET | /v1/sip/calls | Get SIP call logs |
Number Porting
| Method | Endpoint | Description |
|---|---|---|
GET | /v1/sip/port/check | Check number portability |
POST | /v1/sip/port/document | Upload LOA / proof of ownership |
POST | /v1/sip/port/initiate | Submit a port request |
GET | /v1/sip/port | List all port requests |
DELETE | /v1/sip/port/:id | Cancel a port request |
Notes
- A trunk lets you configure the connection once and attach many numbers and DIDs to it.
- Each number can have one inbound and one outbound configuration, attached independently.
- Up to 100 numbers can be attached in a single API call.
- Trunk-bound numbers accept non-E.164 DIDs and extensions in addition to E.164 PSTN numbers.
- All requests must conform to the expected schema; invalid payloads are rejected with a
400response. - Test calls are rate-limited to 10 per 15 minutes per organization.
- Number porting typically takes 7–14 business days. Track status via the dashboard or API.
- Health checks probe outbound endpoints via SIP OPTIONS. Inbound-only configurations show as “unchecked” since there is no outbound endpoint to probe.
Docs for agents: llms.txt